HitList Developer Guide
Acknowledgements
This project is based on the AddressBook-Level3 project created by the SE-EDU initiative.
Setting up, getting started
Refer to the guide Setting up and getting started.
Design
Architecture
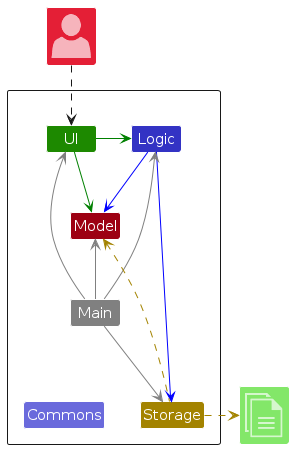
The Architecture Diagram given above explains the high-level design of the App.
Given below is a quick overview of main components and how they interact with each other.
Main components of the architecture
Main (consisting of classes Main and MainApp) is in charge of the app launch and shut down.
- At app launch, it initializes the other components in the correct sequence, and connects them up with each other.
- At shut down, it shuts down the other components and invokes cleanup methods where necessary.
The bulk of the app's work is done by the following four components:
UI: The UI of the App.Logic: The command executor.Model: Holds the data of the App in memory.Storage: Reads data from, and writes data to, the hard disk.
Commons represents a collection of classes used by multiple other components.
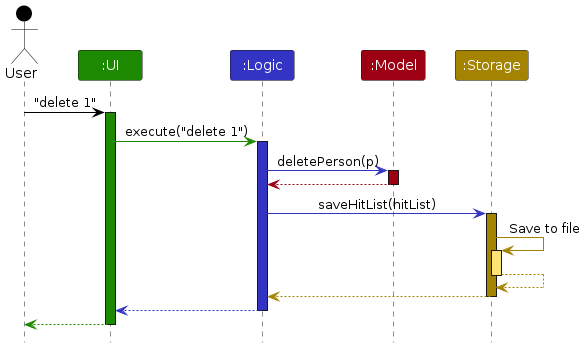
How the architecture components interact with each other
The Sequence Diagram below shows how the components interact with each other for the scenario where the user issues the command delete 1.
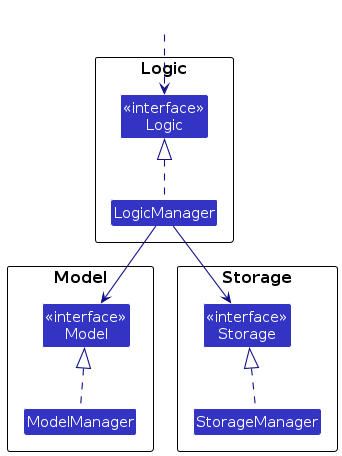
Each of the four main components (also shown in the diagram above),
- defines its API in an
interfacewith the same name as the Component. - implements its functionality using a concrete
{Component Name}Managerclass (which follows the corresponding APIinterfacementioned in the previous point.
For example, the Logic component defines its API in the Logic.java interface and implements its functionality using the LogicManager.java class which follows the Logic interface. Other components interact with a given component through its interface rather than the concrete class (reason: to prevent outside component's being coupled to the implementation of a component), as illustrated in the (partial) class diagram below.
The sections below give more details of each component.
UI component
The API of this component is specified in Ui.java
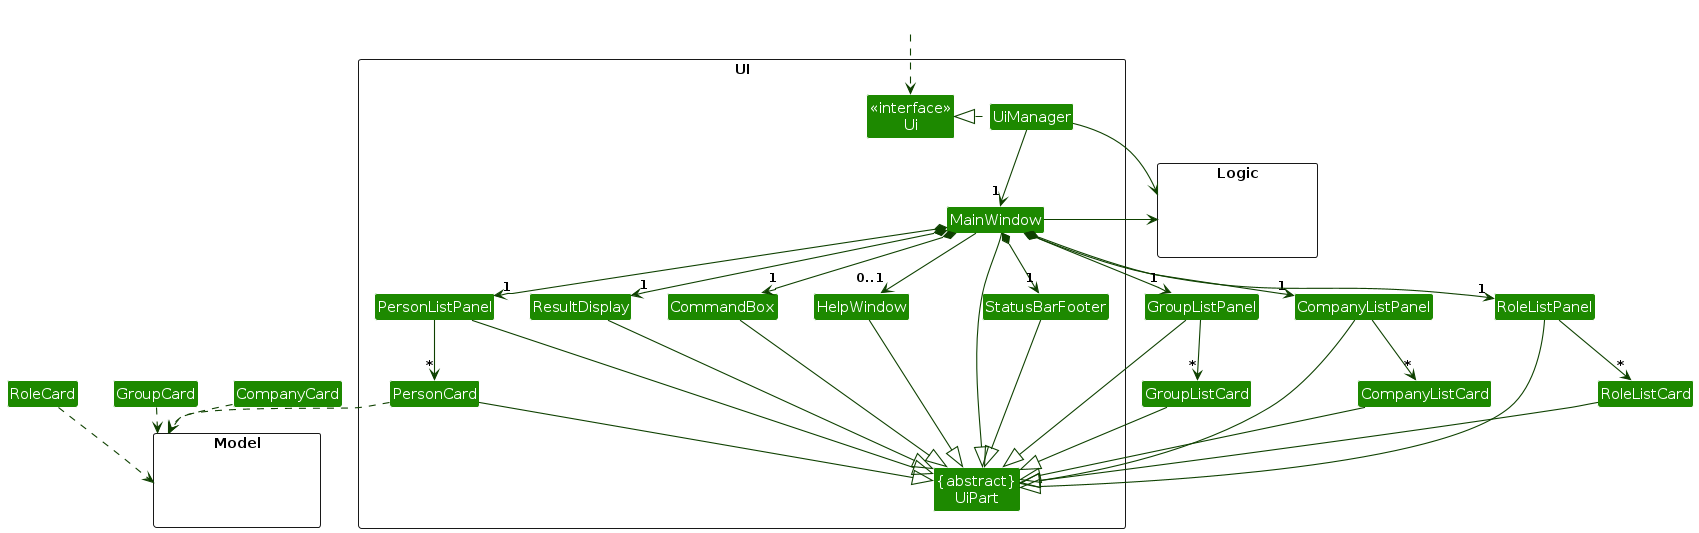
The UI consists of a MainWindow that is made up of parts e.g.CommandBox, ResultDisplay, PersonListPanel, CompanyListPanel, StatusBarFooter etc. All these, including the MainWindow, inherit from the abstract UiPart class which captures the commonalities between classes that represent parts of the visible GUI.
The UI component uses the JavaFx UI framework. The layout of these UI parts are defined in matching .fxml files that are in the src/main/resources/view folder. For example, the layout of the MainWindow is specified in MainWindow.fxml
The UI component,
- executes user commands using the
Logiccomponent. - listens for changes to
Modeldata so that the UI can be updated with the modified data. - keeps a reference to the
Logiccomponent, because theUIrelies on theLogicto execute commands. - depends on some classes in the
Modelcomponent, as it displaysPerson, andCompanyobject residing in theModel.
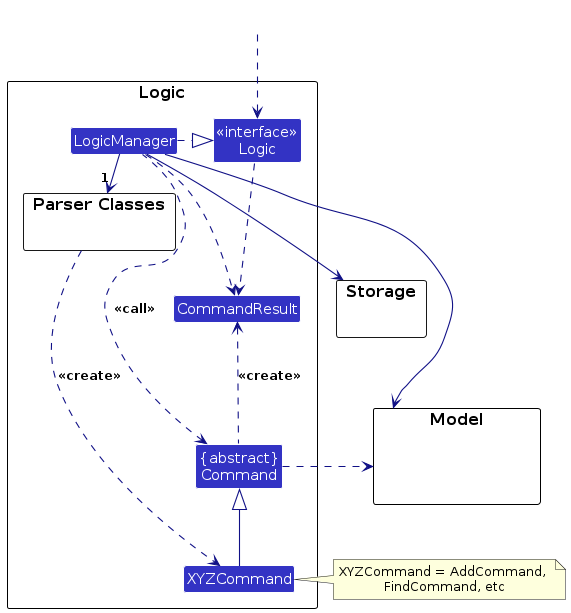
Logic component
API : Logic.java
Here's a (partial) class diagram of the Logic component:
The sequence diagram below illustrates the interactions within the Logic component, taking execute("delete 1") API call as an example.
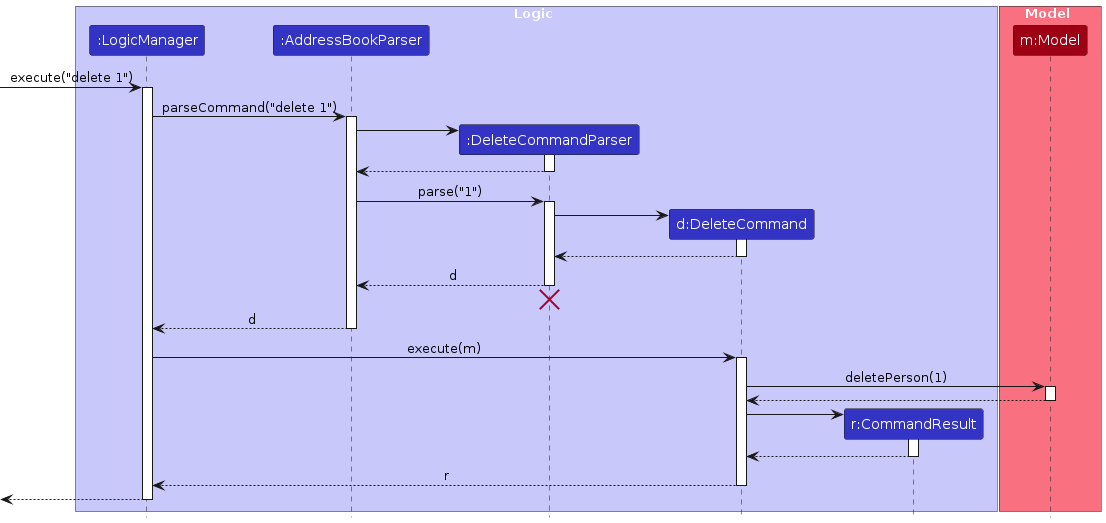
Note: The lifeline for DeleteCommandParser should end at the destroy marker (X) but due to a limitation of PlantUML, the lifeline continues till the end of diagram.
How the Logic component works:
- When
Logicis called upon to execute a command, it is passed to aHitListParserobject which in turn creates a parser that matches the command (e.g.,DeleteCommandParser) and uses it to parse the command. - This results in a
Commandobject (more precisely, an object of one of its subclasses e.g.,DeleteCommand) which is executed by theLogicManager. - The command can communicate with the
Modelwhen it is executed (e.g. to delete a person).
Note that although this is shown as a single step in the diagram above (for simplicity), in the code it can take several interactions (between the command object and theModel) to achieve. - The result of the command execution is encapsulated as a
CommandResultobject which is returned back fromLogic.
Here are the other classes in Logic (omitted from the class diagram above) that are used for parsing a user command:
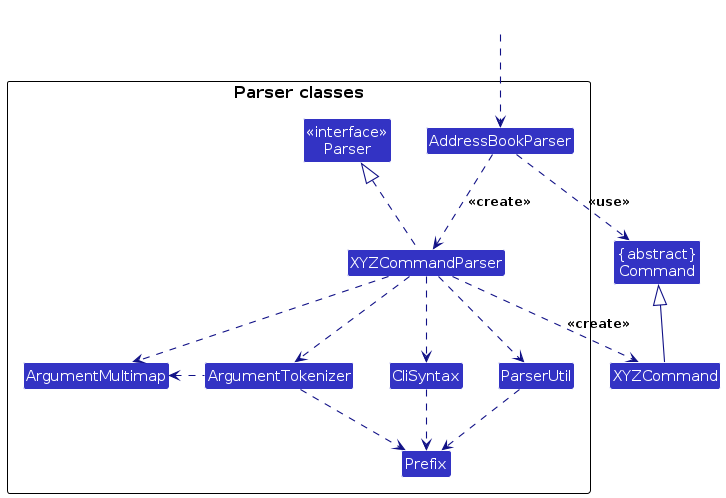
How the parsing works:
- When called upon to parse a user command, the
HitListParserclass creates anXYZCommandParser(XYZis a placeholder for the specific command name e.g.,AddCommandParser) which uses the other classes shown above to parse the user command and create aXYZCommandobject (e.g.,AddCommand) which theHitListParserreturns back as aCommandobject. - All
XYZCommandParserclasses (e.g.,AddCommandParser,DeleteCommandParser, ...) inherit from theParserinterface so that they can be treated similarly where possible e.g, during testing.
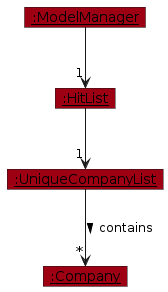
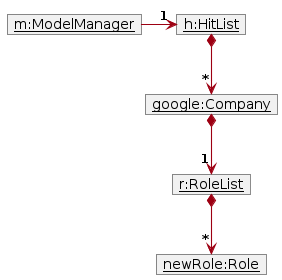
Model component
API : Model.java

The Model component,
- stores HitList data i.e., all
Person,GroupandCompanyobjects (which are contained in aUniquePersonList,UniqueGroupListandUniqueCompanyListobject). - stores the currently 'selected'
Person,GrouporCompanyobjects (e.g., results of a search query) as a separate filtered list which is exposed to outsiders as an unmodifiableObservableList<Person>,ObservableList<Group>orObservableList<Company>that can be 'observed' e.g. the UI can be bound to this list so that the UI automatically updates when the data in the list change. - stores a
UserPrefobject that represents the user’s preferences. This is exposed to the outside as aReadOnlyUserPrefobjects. - does not depend on any of the other three components (as the
Modelrepresents data entities of the domain, they should make sense on their own without depending on other components)
Storage component
API : Storage.java
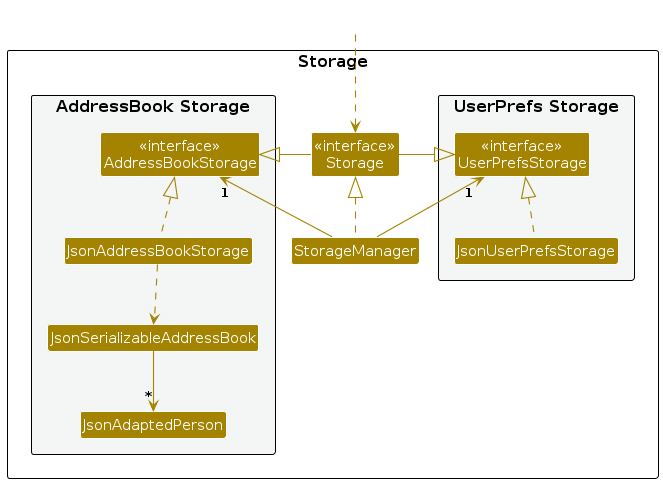
The Storage component,
- can save both HitList data and user preference data in JSON format, and read them back into corresponding objects.
- inherits from both
HitListStorageandUserPrefStorage, which means it can be treated as either one (if only the functionality of only one is needed). - depends on some classes in the
Modelcomponent (because theStoragecomponent's job is to save/retrieve objects that belong to theModel)
Common classes
Classes used by multiple components are in the hitlist.commons package.
Implementation
This section describes some noteworthy details on how certain features are implemented.
Company Profile
A Company object represents a company profile. It has the following details:
companyName(required): The name of the company.companyDescription(required): A description of the company.companyRoles(optional): A list of roles that the headhunter is recruiting for within the company.
A Role object represents a role that the headhunter is recruiting for within a company. It has the following details:
companyRole(required): The name of the role.companyRoleDescription(required): A description of the role.
Design considerations for Company Parameters:
Aspect: Company Field Requirements:
Alternative 1 (current choice): Both company name and description are required fields.
- Pros: Ensures that all company profiles have a minimum level of information, which can be useful for the headhunter to quickly identify and differentiate between companies.
- Cons: May be too restrictive for users who want to quickly add a company profile with minimal information and fill in the details later.
Alternative 2: Only the company name is required, while the description is optional.
- Pros: Provides more flexibility for users to add company profiles with minimal information and update them later as needed.
- Cons: May lead to incomplete company profiles that lack important information, making it harder for the headhunter to manage their client base effectively.
Aspect: Validation of Company Names:
Alternative 1: Use strict regex [1][\p{Alnum} ]*$ to only allow alphanumeric characters and spaces.
- Pros: Prevents users from accidentally entering malformed data or using symbols that might break the CLI formatting.
- Cons: Prevents users from adding companies with valid symbols in their names (e.g., 'LEAK X'PRESS' PLUMBING & CONSTRUCTION).
Alternative 2 (current choice): Use a custom regex [[2][^/\v]{1,29}$] (Must not start with a space, contain / or have newlines and be within the length limit of 2 to 30 characters).
- Pros: Highly flexible for the user.
- Cons: Could allow completely nonsensical company names like !!! or ???.
Aspect: Validation of Company Description:
Alternative 1: Use strict regex [3][\p{Alnum} ]*$ to only allow alphanumeric characters and spaces.
- Pros: Prevents users from accidentally entering malformed data or using symbols that might break the CLI formatting.
- Cons: Prevents users from adding companies with valid symbols in their names (e.g., 'LEAK X'PRESS' PLUMBING & CONSTRUCTION).
Alternative 2 (current choice): Use a custom regex [[4][^/\v]{1,999}$] (Must not start with a space, contain / or have newlines and be within the length limit of 2 to 1000 characters).
- Pros: Highly flexible for the user.
- Cons: Could allow completely nonsensical company names like !!! or ???.
Design considerations for Company Commands:
Aspect: Command Format for Parameters:
Alternative 1 (current choice): Use prefixes to indicate parameters (e.g.,
/cfor company name,/dfor description).- Pros: Clear and unambiguous parsing of parameters, especially when there are multiple parameters.
- Cons: Requires users to remember and use specific prefixes.
Alternative 2: Use a fixed order of parameters without prefixes (e.g.,
cmpadd Google Tech Company).- Pros: Simpler command format, less typing for users.
- Cons: Parsing can be more error-prone, especially if parameters can contain spaces or if there are optional parameters.
Aspect: Handling Duplicate Companies:
Alternative 1 (current choice): Check for duplicates based on company name and reject the addition if a duplicate is found.
- Pros: Prevents cluttering the HitList with duplicate entries, maintains data integrity.
- Cons: Does not account for edge cases where two distinct companies might share the same names.
Alternative 2: Allow duplicates but provide a warning to the user.
- Pros: Provides flexibility for users who may want to add similar companies, avoids false positives in duplicate detection.
- Cons: Can lead to a cluttered HitList and make it harder for users to manage their contacts effectively.
Adding a company
The AddCompany mechanism is facilitated by AddCompanyCommand and its associated parser AddCompanyCommandParser. It allows users to add a new company to the HitList.
The feature implements the following key operations:
AddCompanyCommandParser#parse()— Parses the user input to extract the company name (indicated by the/cprefix) and the description (indicated by the/dprefix).AddCompanyCommand#execute()— Executes the logic to add the parsed company to the model.Model#addCompany()— Updates the HitList within the Model state with the newly created company.
Given below is an example usage scenario and how the AddCompany mechanism behaves at each step.
Step 1. The user launches the application and types cmpadd /c Google /d Tech Company into the command box.
Step 2. The LogicManager intercepts the user input and calls HitListParser#parseCommand("cmpadd /c Google /d Tech Company").
Step 3. Recognizing the cmpadd command word, the HitListParser instantiates an AddCompanyCommandParser.
Step 4. The HitListParser calls the parse(" /c Google /d Tech Company") method of the newly created AddCompanyCommandParser. The parser extracts the company details, creates a new Company object (representing Google), and passes it into the constructor of a new AddCompanyCommand.
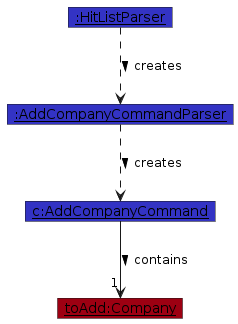
Step 5. The AddCompanyCommand is returned to the LogicManager, and the AddCompanyCommandParser is subsequently destroyed.
Step 6. LogicManager calls AddCompanyCommand#execute(). This command calls Model#addCompany(companyToAdd), passing the parsed company object to update the internal HitList state.
Step 7. Finally, Storage saves the updated HitList to the hard disk, and the LogicManager returns the CommandResult to the UI to display a success message to the user.
The following sequence diagram shows how an AddCompany operation goes through the Logic component:

Note: The lifeline for AddCompanyCommand and AddCompanyCommandParser should end at the destroy marker (X) but due to a limitation of PlantUML, the lifeline reaches the end of diagram.
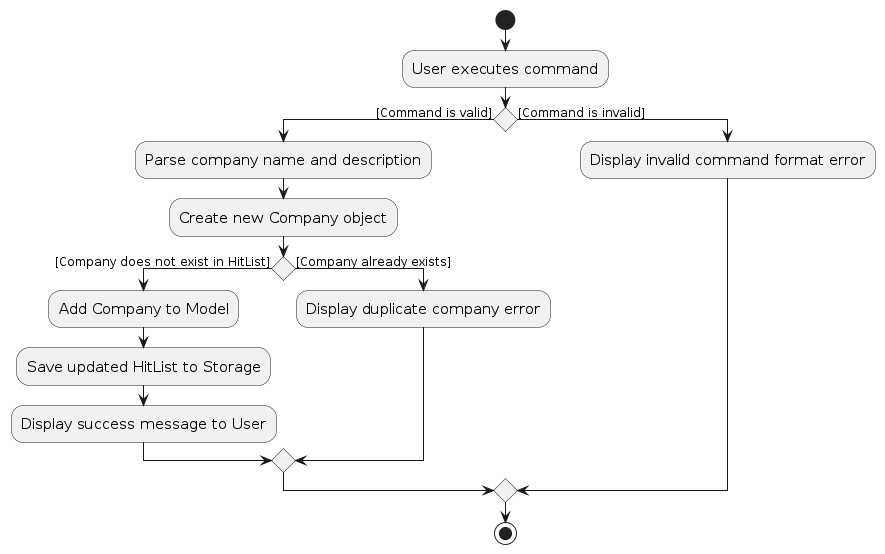
The following activity diagram summarizes what happens when a user executes the cmpadd command:
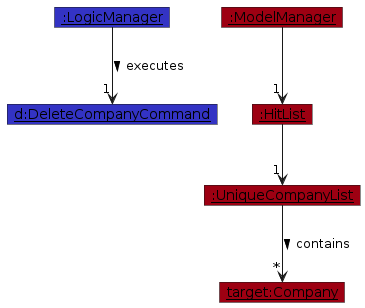
Deleting a company
The DeleteCompany mechanism is facilitated by DeleteCompanyCommand and its associated parser DeleteCompanyCommandParser. It allows users to remove an existing company from HitList, either by specifying its exact name or its displayed index in the UI.
The feature implements the following key operations:
DeleteCompanyCommandParser#parse()— Parses the user input to determine if the deletion target is an index or a company name (indicated by the/cprefix).DeleteCompanyCommand#execute()— Executes the logic to verify the target's existence and remove it from the model.Model#deleteCompany()— Updates the HitList within the Model state by removing the specified company.
Given below is an example usage scenario and how the DeleteCompany mechanism behaves at each step.
Step 1. The user launches the application and types cmpdel /c Google into the command box.
Step 2. The LogicManager intercepts the user input and calls HitListParser#parseCommand("cmpdel /c Google").
Step 3. Recognizing the cmpdel command word, the HitListParser instantiates a DeleteCompanyCommandParser.
Step 4. The HitListParser calls the parse(" /c Google") method of the newly created DeleteCompanyCommandParser. The parser extracts the target company name, creates a new DeleteCompanyCommand targeting "Google", and returns it. (Note: If the user had typed cmpdel 1, the parser would extract the index instead).
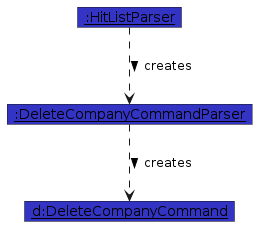
Step 5. The DeleteCompanyCommand is returned to the LogicManager, and the DeleteCompanyCommandParser is subsequently destroyed.
Step 6. LogicManager calls DeleteCompanyCommand#execute(). The command retrieves the target company and calls Model#deleteCompany(target) to remove it from the internal HitList state.
Step 7. Finally, Storage saves the updated HitList to the hard disk, and the LogicManager returns the CommandResult to the UI to display a success message to the user.
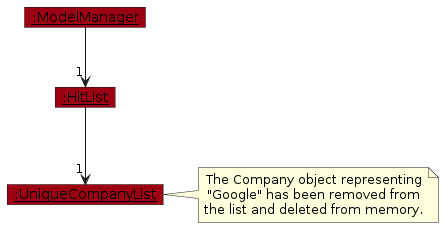
The following sequence diagram shows how an AddCompany operation goes through the Logic component:
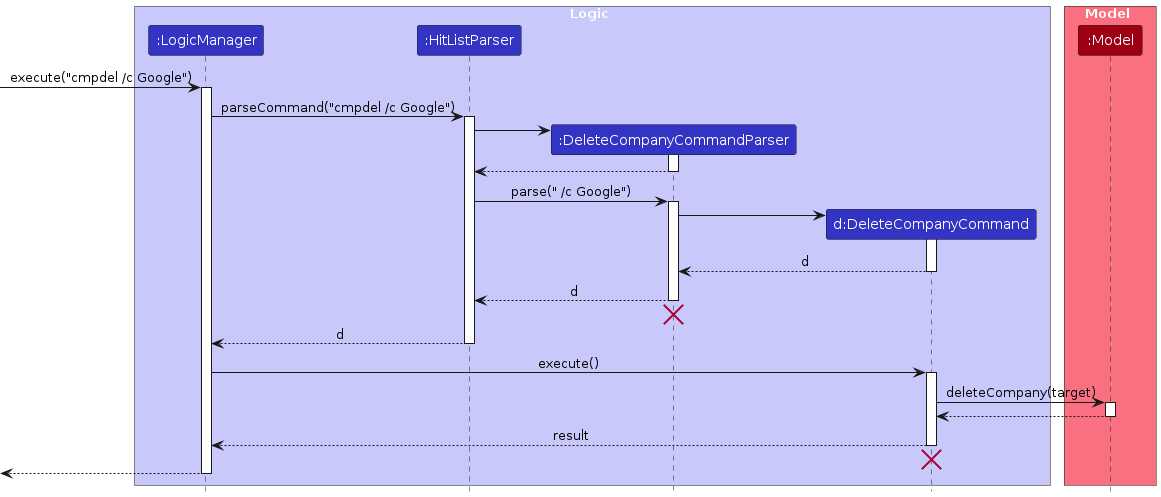
Note: The lifeline for DeleteCompanyCommand and DeleteCompanyCommandParser should end at the destroy marker (X) but due to a limitation of PlantUML, the lifeline reaches the end of diagram.
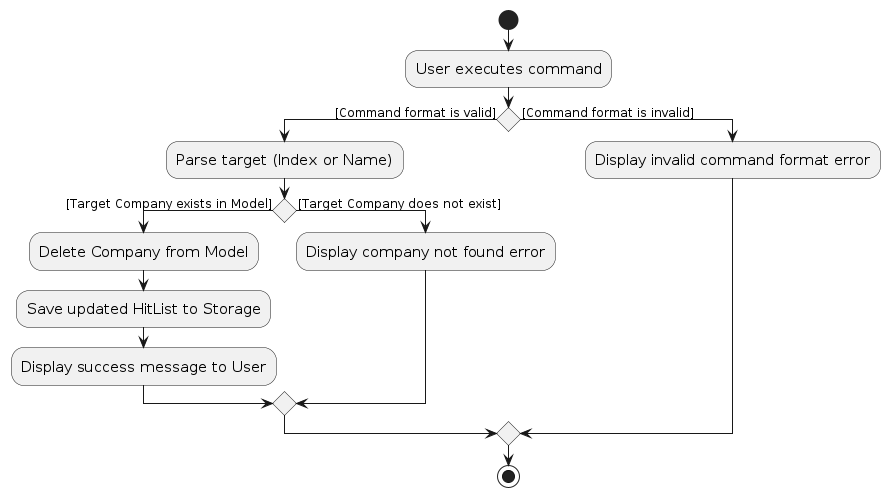
The following activity diagram summarizes what happens when a user executes the cmpdel command:
Design considerations for Roles Parameters:
Aspect: Company Field Requirements:
Alternative 1 (current choice): Both role name and role description are required fields.
- Pros: Ensures that all roles have a minimum level of information, which can be useful for the headhunter to quickly identify the requirements of clients request.
- Cons: May be too restrictive for users who want to quickly add a role without the description first and fill in the details later.
Alternative 2: Only the company name is required, while the description is optional.
- Pros: Provides more flexibility for users to add company profiles with minimal information and update them later as needed.
- Cons: May lead to incomplete company profiles that lack important information, making it harder for the headhunter to manage their client base effectively.
Aspect: Validation of Role Names:
Alternative 1: Use strict regex [5][\p{Alnum} ]*$ to only allow alphanumeric characters and spaces.
- Pros: Prevents users from accidentally entering malformed data or using symbols that might break the CLI formatting.
- Cons: Prevents users from adding companies with valid symbols in their names (e.g., Front-end Developer).
Alternative 2 (current choice): Use a custom regex [[6][^/\v]{1,49}$] (Must not start with a space, contain / or have newlines and be within the length limit of 2 to 50 characters).
- Pros: Highly flexible for the user.
- Cons: Could allow completely nonsensical company names like !!! or ???.
Aspect: Validation of Role Description:
Alternative 1: Use strict regex [7][\p{Alnum} ]*$ to only allow alphanumeric characters and spaces.
- Pros: Prevents users from accidentally entering malformed data or using symbols that might break the CLI formatting.
- Cons: Prevents users from adding companies with valid symbols in their names (e.g., Art Direction + Brand Identity).
Alternative 2 (current choice): Use a custom regex [[8][^/\v]{1,999}$] (Must not start with a space, contain / or have newlines and be within the length limit of 2 to 1000 characters).
- Pros: Highly flexible for the user.
- Cons: Could allow completely nonsensical company names like !!! or ???.
Design considerations for Roles Commands:
Aspect: Command Format for Parameters:
Alternative 1 (current choice): Use prefixes to indicate parameters (e.g.,
/cfor role name,/dfor role description).- Pros: Clear and unambiguous parsing of parameters, especially when there are multiple parameters.
- Cons: Requires users to remember and use specific prefixes.
Alternative 2: Use a fixed order of parameters without prefixes (e.g.,
roleadd Software Engineer Develops Software).- Pros: Simpler command format, less typing for users.
- Cons: Parsing can be more error-prone, especially if parameters can contain spaces or if there are optional parameters.
Aspect: Handling Duplicate Roles:
Alternative 1 (current choice): Check for duplicates based on role name and reject the addition if a duplicate is found.
- Pros: Prevents cluttering the HitList with duplicate entries, maintains data integrity.
- Cons: Does not account for edge cases where two distinct role might share the same names.
Alternative 2: Allow duplicates but provide a warning to the user.
- Pros: Provides flexibility for users who may want to add similar roles, avoids false positives in duplicate detection.
- Cons: Can lead to a cluttered HitList and make it harder for users to manage the company roles effectively.
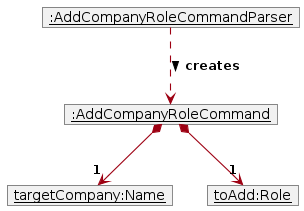
Adding a role to a specified company
The AddRole mechanism is facilitated by AddCompanyRoleCommand and its associated parser AddCompanyRoleCommandParser. It allows users to add a new role to an existing company in the HitList.
The feature implements the following key operations:
AddCompanyRoleCommandParser#parse()— Parses the user input to extract the target company (indicated by the/cprefix), role name (indicated by the/rprefix) and role description (indicated by the/dprefix).AddCompanyRoleCommand#execute()— Executes the logic to add the parsed role to the target company in the model.Model#addCompanyRole()— Updates the HitList within the Model state by adding the new role to the target company.
Given below is an example usage scenario and how the AddRole mechanism behaves at each step.
Step 1. The user launches the application and types roleadd /c Google /r Software Engineer /d Develops Software into the command box.
Step 2. The LogicManager intercepts the user input and calls HitListParser#parseCommand("roleadd /c Google /r Software Engineer /d Develops Software").
Step 3. Recognizing the roleadd command word, the HitListParser instantiates an AddCompanyRoleCommandParser.
Step 4. The HitListParser calls the parse(" /c Google /r Software Engineer /d Develops Software") method of the newly created AddCompanyRoleCommandParser. The parser extracts the target company name, role details, creates a new Role object (representing Software Engineer), and passes it into the constructor of a new AddCompanyRoleCommand.
Step 5. The AddCompanyRoleCommand is returned to the LogicManager, and the AddCompanyRoleCommandParser is subsequently destroyed.
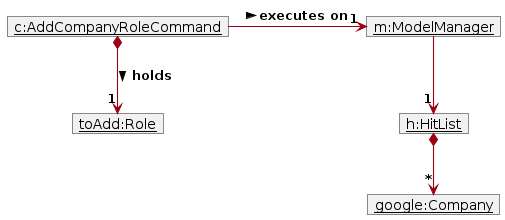
Step 6. LogicManager calls AddCompanyRoleCommand#execute(). This command calls Model#addCompanyRole(targetCompany, roleToAdd), passing the target company and the parsed role object to update the internal HitList state.
Step 7. Finally, Storage saves the updated HitList to the hard disk, and the LogicManager returns the CommandResult to the UI to display a success message to the user.
The following sequence diagram shows how an AddRole operation goes through the Logic component:
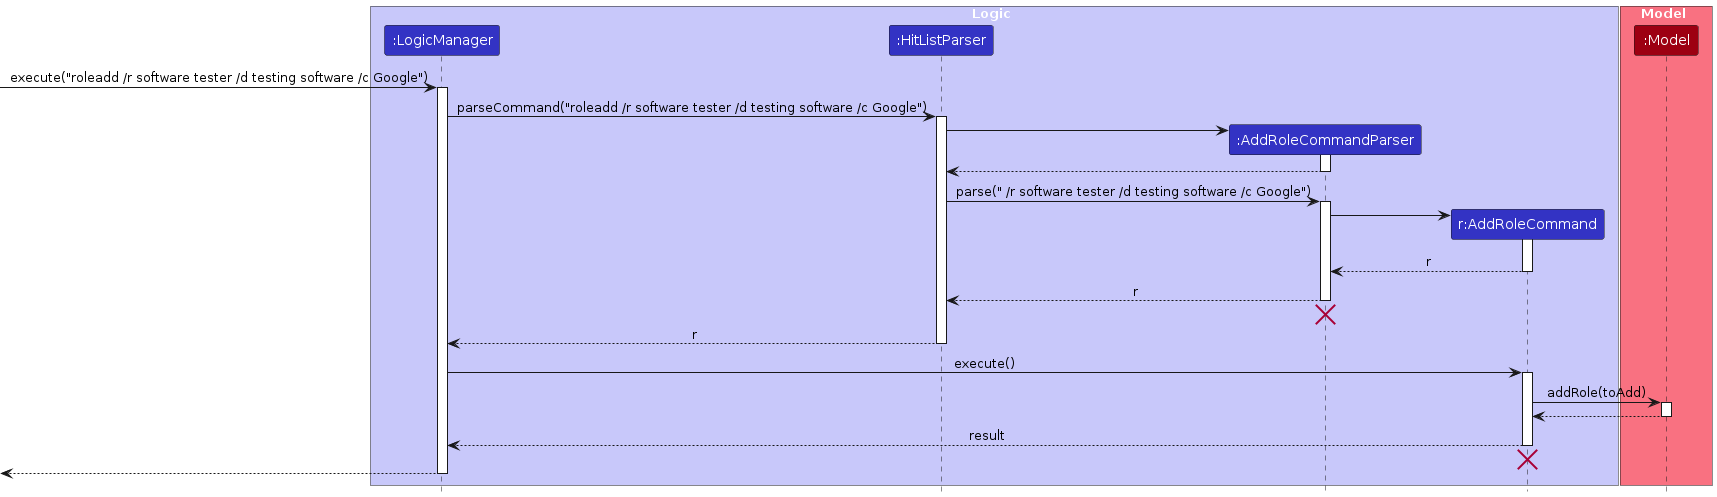
Note: The lifeline for AddCompanyRoleCommand and AddCompanyRoleCommandParser should end at the destroy marker (X) but due to a limitation of PlantUML, the lifeline reaches the end of diagram.
The following activity diagram summarizes what happens when a user executes the roleadd command:
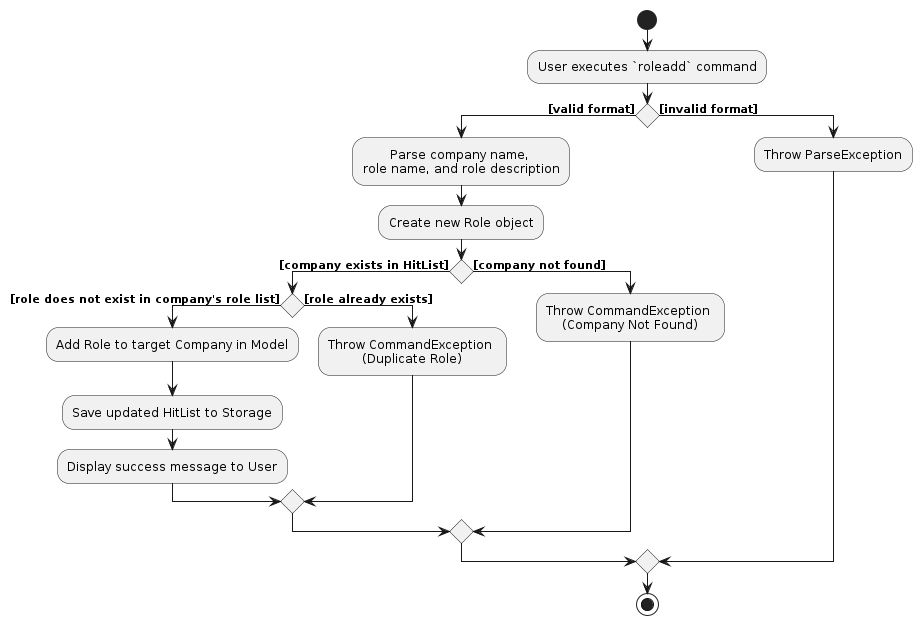
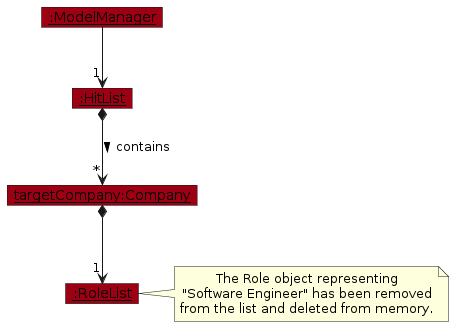
Deleting a role from a specified company
The DeleteRole mechanism is facilitated by DeleteCompanyRoleCommand and its associated parser DeleteCompanyRoleCommandParser. It allows users to remove an existing role from a company in the HitList, either by specifying the role's name or its displayed index in the UI.
The feature implements the following key operations:
DeleteCompanyRoleCommandParser#parse()— Parses the user input to determine if the deletion target is an index or a role name (indicated by the/rprefix), as well as the target company (indicated by the/cprefix).DeleteCompanyRoleCommand#execute()— Executes the logic to verify the target's existence and remove it from the target company in the model.Model#deleteCompanyRole()— Updates the HitList within the Model state by removing the specified role from the target company.
Given below is an example usage scenario and how the DeleteRole mechanism behaves at each step.
Step 1. The user launches the application and types roledel /c Google /r Software Engineer into the command box.
Step 2. The LogicManager intercepts the user input and calls HitListParser#parseCommand("roledel /c Google /r Software Engineer").
Step 3. Recognizing the roledel command word, the HitListParser instantiates a DeleteCompanyRoleCommandParser.
Step 4. The HitListParser calls the parse(" /c Google /r Software Engineer") method of the newly created DeleteCompanyRoleCommandParser. The parser extracts the target company name, role name, creates a new DeleteCompanyRoleCommand targeting the "Software Engineer" role in "Google", and returns it. (Note: If the user had typed roledel /c Google 1, the parser would extract the role index instead).
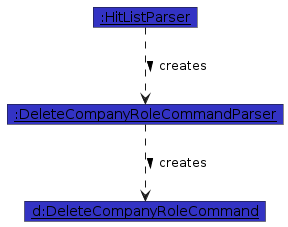
Step 5. The DeleteCompanyRoleCommand is returned to the LogicManager, and the DeleteCompanyRoleCommandParser is subsequently destroyed.
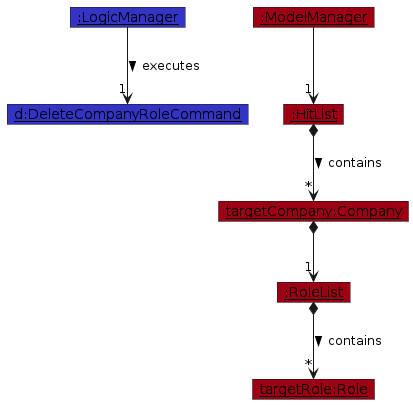
Step 6. LogicManager calls DeleteCompanyRoleCommand#execute(). The command retrieves the target company and role, and calls Model#deleteCompanyRole(targetCompany, targetRole) to remove the role from the target company in the internal HitList state.
Step 7. Finally, Storage saves the updated HitList to the hard disk, and the LogicManager returns the CommandResult to the UI to display a success message to the user.
The following sequence diagram shows how a DeleteRole operation goes through the Logic component:
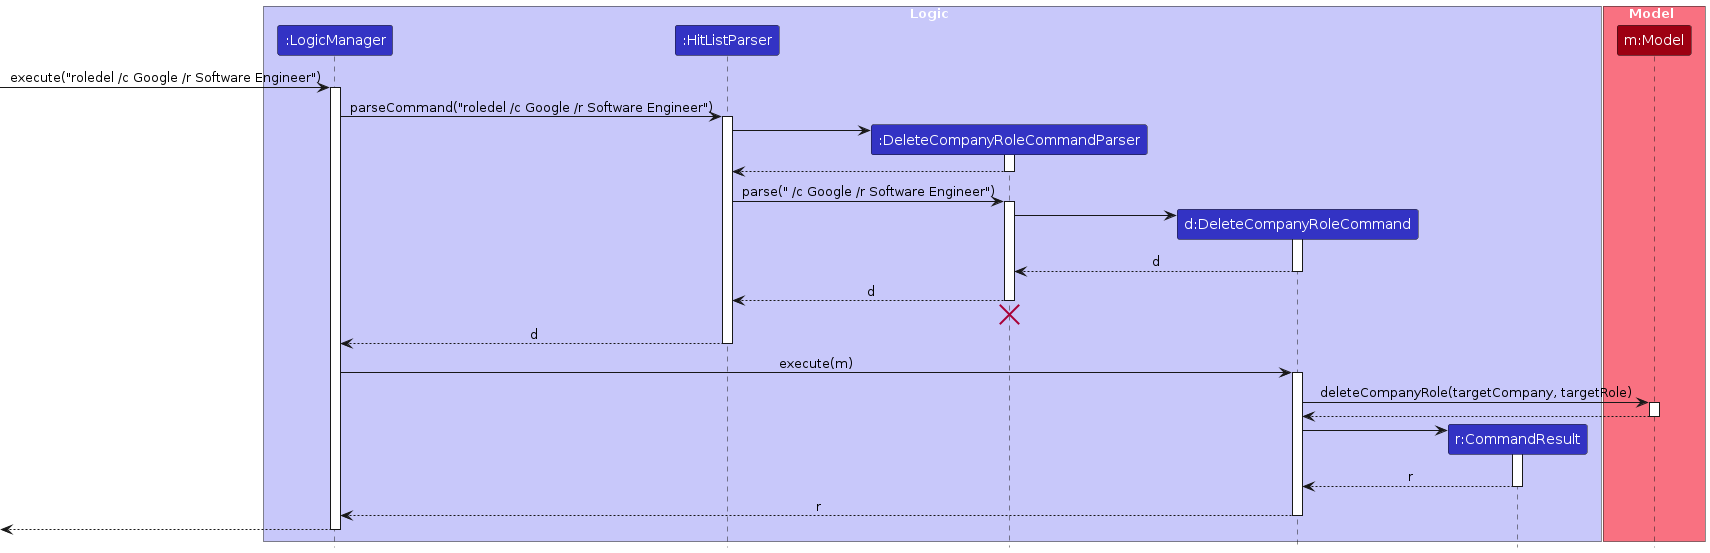
Note: The lifeline for DeleteCompanyRoleCommand and DeleteCompanyRoleCommandParser should end at the destroy marker (X) but due to a limitation of PlantUML, the lifeline reaches the end of diagram.
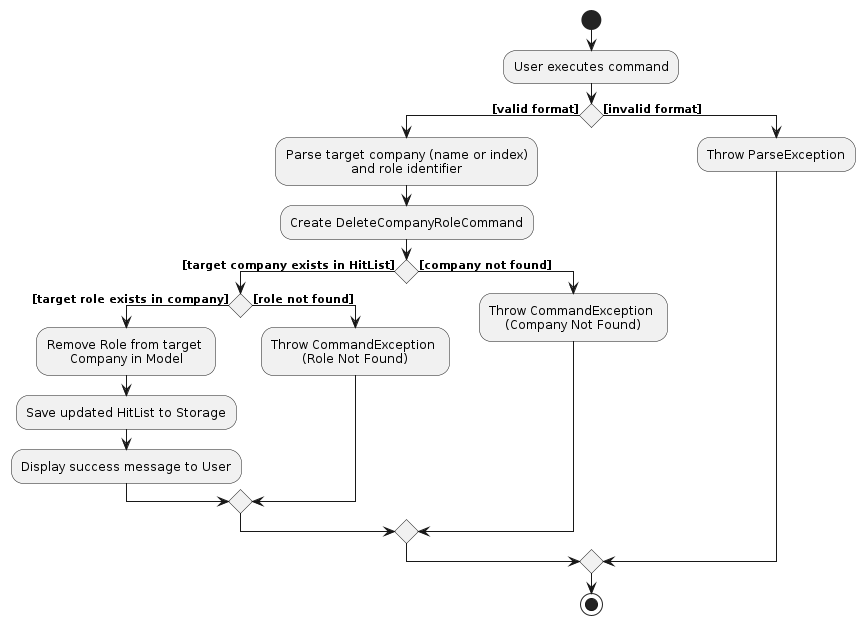
The following activity diagram summarizes what happens when a user executes the roledel command:
[Proposed] Undo/redo feature
Proposed Implementation
The proposed undo/redo mechanism is facilitated by VersionedHitList. It extends HitList with an undo/redo history, stored internally as an addressBookStateList and currentStatePointer. Additionally, it implements the following operations:
VersionedHitList#commit()— Saves the current HitList state in its history.VersionedHitList#undo()— Restores the previous HitList state from its history.VersionedHitList#redo()— Restores a previously undone HitList state from its history.
These operations are exposed in the Model interface as Model#commitHitList(), Model#undoHitList() and Model#redoHitList() respectively.
Given below is an example usage scenario and how the undo/redo mechanism behaves at each step.
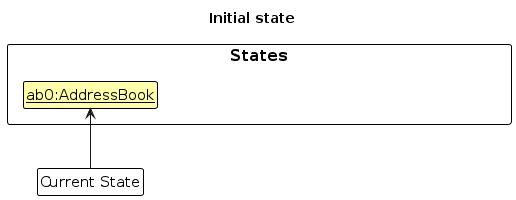
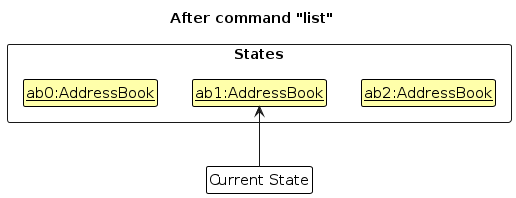
Step 1. The user launches the application for the first time. The VersionedHitList will be initialized with the initial HitList state, and the currentStatePointer pointing to that single HitList state.
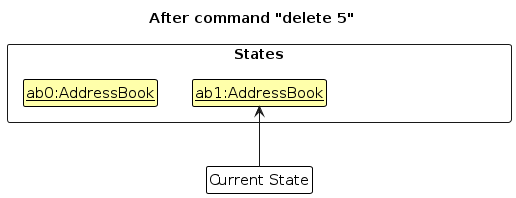
Step 2. The user executes delete 5 command to delete the 5th person in HitList. The delete command calls Model#commitHitList(), causing the modified state of HitList after the delete 5 command executes to be saved in the hitListStateList, and the currentStatePointer is shifted to the newly inserted HitList state.
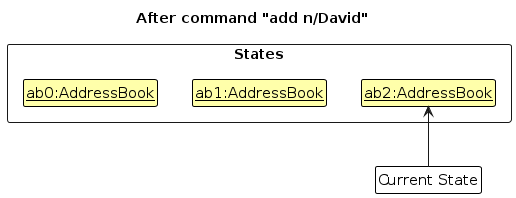
Step 3. The user executes add n/David … to add a new person. The add command also calls Model#commitHitList(), causing another modified HitList state to be saved into the hitListStateList.
Note: If a command fails its execution, it will not call Model#commitHitList(), so HitList state will not be saved into the hitListStateList.
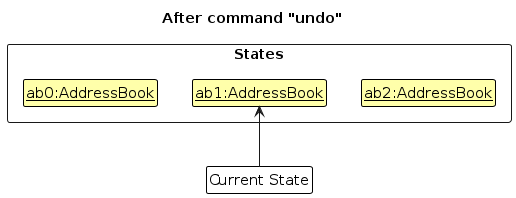
Step 4. The user now decides that adding the person was a mistake, and decides to undo that action by executing the undo command. The undo command will call Model#undoHitList(), which will shift the currentStatePointer once to the left, pointing it to the previous HitList state, and restores HitList to that state.
Note: If the currentStatePointer is at index 0, pointing to the initial HitList state, then there are no previous HitList states to restore. The undo command uses Model#canUndoHitList() to check if this is the case. If so, it will return an error to the user rather
than attempting to perform the undo.
The following sequence diagram shows how an undo operation goes through the Logic component:
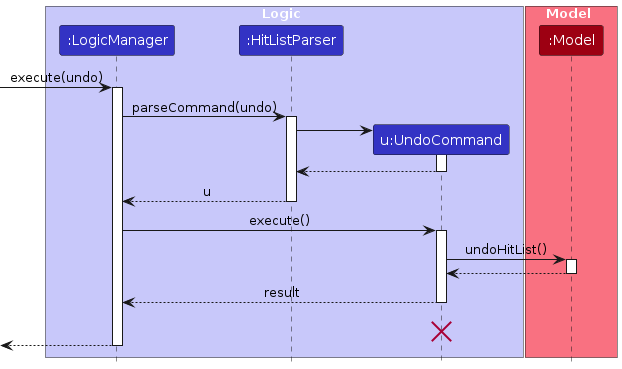
Note: The lifeline for UndoCommand should end at the destroy marker (X) but due to a limitation of PlantUML, the lifeline reaches the end of diagram.
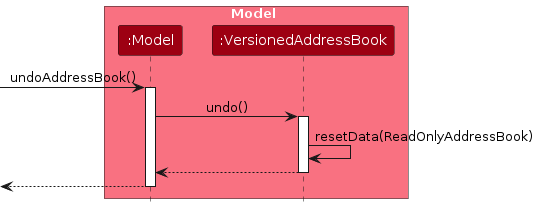
Similarly, how an undo operation goes through the Model component is shown below:
The redo command does the opposite — it calls Model#redoHitList(), which shifts the currentStatePointer once to the right, pointing to the previously undone state, and restores HitList to that state.
Note: If the currentStatePointer is at index hitListStateList.size() - 1, pointing to the latest HitList state, then there are no undone HitList states to restore. The redo command uses Model#canRedoHitList() to check if this is the case. If so, it will return an error to the user rather than attempting to perform the redo.
Step 5. The user then decides to execute the command list. Commands that do not modify HitList, such as list, will usually not call Model#commitHitList(), Model#undoHitList() or Model#redoHitList(). Thus, the hitListStateList remains unchanged.
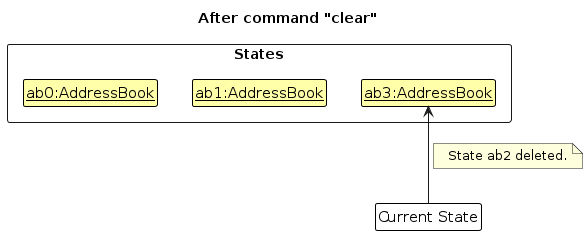
Step 6. The user executes clear, which calls Model#commitAddressBook(). Since the currentStatePointer is not pointing at the end of the hitListStateList, all HitList states after the currentStatePointer will be purged. Reason: It no longer makes sense to redo the add n/David … command. This is the behavior that most modern desktop applications follow.
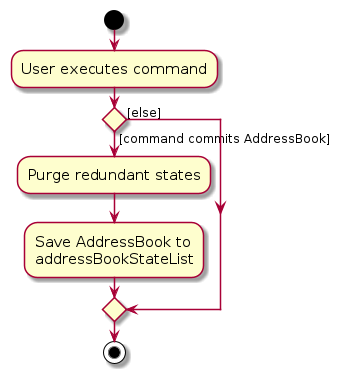
The following activity diagram summarizes what happens when a user executes a new command:
Design considerations:
Aspect: How undo & redo executes:
Alternative 1 (current choice): Saves the entire HitList.
- Pros: Easy to implement.
- Cons: May have performance issues in terms of memory usage.
Alternative 2: Individual command knows how to undo/redo by itself.
- Pros: Will use less memory (e.g. for
delete, just save the person being deleted). - Cons: We must ensure that the implementation of each individual command are correct.
- Pros: Will use less memory (e.g. for
{more aspects and alternatives to be added}
[Proposed] Data archiving
{Explain here how the data archiving feature will be implemented}
Documentation, logging, testing, configuration, dev-ops
Appendix: Requirements
Product scope
Target user profile:
- headhunters and recruiters
- fast typist
- headhunts for multiple companies
- needs to track both candidate and company contacts
- needs to keep track of candidates' status (unemployed/graduating/etc.)
Value proposition: alleviate the logistics of matching candidates to clients
User stories
Priorities: High (must have) - * * *, Medium (nice to have) - * *, Low (unlikely to have) - *
| Priority | As a … | I want to … | So that I can… |
|---|---|---|---|
* * * | Headhunter | add new candidate contacts | build a database of potential hires for future placements |
* * * | Headhunter | delete contacts | keep my database uncluttered by removing irrelevant candidates contacts |
* * * | Headhunter | list contacts | easily browse my talent pool to locate specific individuals |
* * * | Headhunter | add contact groups | keep track of which candidates are headhunted for the companies |
* * * | Headhunter | delete contact groups | remove the group for a role when it is already filled |
* * * | Headhunter | list contact groups | view a complete overview of all the job groups I have added to the system |
* * * | Headhunter | add contacts to contact groups | build a targeted shortlist of candidates for a specific job opening |
* * * | Headhunter | delete contacts from contact groups | keep my shortlist accurate by removing candidates who are no longer in the running for that role |
* * * | Headhunter | list contact group members | easily evaluate and compare all shortlisted candidates for a specific open position |
* * * | Headhunter | add company profile | keep track of the companies I am headhunting for |
* * * | Headhunter | delete company profile | remove the companies that have stopped using my headhunting services |
* * * | Headhunter | list all company profile | view all companies I am headhunting for to get a high-level overview of my client base |
* * | Headhunter | add company roles to company profile | maintain comprehensive records of my clients' requirements and contact information |
* * | Headhunter | delete company roles from company profile | keep my client records accurate by removing outdated or incorrect information |
* * | Headhunter | list specific company profile | review all the active job placements that particular client has hired me to fill |
{More to be added}
Use cases
For all use cases below, the System is the HitList, Actor is the user and Precondition is the app actively runs and runs on Java 17, unless specified otherwise
Use case 1: Add a contact
MSS
User requests to add a contact
System creates the contact
System confirms that the contact has been created
Use case ends.
Extensions
1a. System detects that a contact with the same phone number already exists.
- 1a1. System shows previously added contact with the same phone number message
Use case ends.
Use case 2: Delete a contact
MSS
User requests to delete a contact
System deletes the contact
System confirms that the contact has been deleted
Use case ends.
Extensions
1a. System detects that the requested contact does not exist.
- 1a1. System shows requested contact does not exist message
Use case ends.
Use case 3: List contacts
MSS
User requests to list all contacts
System displays all contacts
Use case ends.
Extensions
2a. System detects that the contact list is empty
- 2a1. System shows contact list is empty message
Use case ends.
Use case 4: Add a contact group
MSS
User requests to add a contact group
System creates the contact group
System informs user that the contact group has been created
Use case ends.
Extensions
2a. System detects that a company profile with the same name already exists
- 2a1. System shows company profile already exists message
Use case ends.
Use case 5: Delete a contact group
MSS
User requests to delete a contact group
System deletes the contact group
System informs user that the contact group has been deleted
Use case ends.
Extensions
1a. System detects that the contact group does not exist.
- 1a1. System shows contact group does not exist message
Use case ends.
Use case 6: List contact groups
MSS
User requests to list all contact groups
System displays all contacts
Use case ends.
Extensions
2a. System detects that there are no contact groups
- 2a1. System shows no contact groups message
Use case ends.
Use case 7: Add a contact to a contact group
MSS
User creates a contact (UC1)
User creates a contact group (UC4)
User requests to add the contact to the contact group
System creates the contact group
System informs user that the contact group has been created
Use case ends.
Extensions
4a. System detects that the contact is already in the contact group
- 4a1. System shows contact is already in the contact group message
4b. System detects that contact group does not exist
- 4b1. System shows contact group does not exist message
4c. System detects that contact does not exist
- 4c1. System shows contact does not exist message
Use case ends.
Use case 7: Remove contacts from contact group
MSS
User requests remove a contact from a contact group
System informs user that the contact has been removed from the contact group
Use case ends.
Extensions
2a. System detects there is no such contact in the contact group
- 2a1. System shows contact is not in the contact group message
2b. System detects that contact group does not exist
- 2b1. System shows contact group does not exist message
2c. System detects that contact does not exist
- 2c1. System shows contact does not exist message
Use case ends.
Use case 8: List contact group members
MSS
User requests to list contact group members of a specified contact group
System displays all contact group members of the specified contact group
Use case ends.
Extensions
2a. System detects that the specified contact group does not exist
- 2a1. System shows contact group does not exist message
Use case ends.
Use case 9: Add a company profile
MSS
User requests to add a company profile
System creates the company profile
System confirms that the company profile has been created
Use case ends.
Extensions
1a. System detects that a company profile with the same name already exists
- 1a1. System shows company profile already exists message
Use case ends.
Use case 10: Delete a company profile
MSS
User requests to delete a company profile
System removes the company profile
System confirms that the company profile has been deleted
Use case ends.
Extensions
2a. System detects that the specified company does not exist
- 2a1. System shows company profile does not exist message
Use case ends.
Use case 11: List company profile
MSS
User requests to list company profiles
System displays all contact group members of the specified contact group
Use case ends.
Extensions
2a. System detects that specified contact group does not exist
- 2a1. System shows contact group does not exist message
Use case ends.
Use case 12: Add company details to company profile
MSS
User adds a company profile (UC9)
User requests to add company details to the company profile
System confirms that the company details has been updated
Use case ends.
Extensions
2a. System detects that the specified company profile does not exist
- 2a1. System shows company profile does not exist message
2b. System detects that the company details already exist in the company profile
- 2b1. System shows company details already exist message
Use case ends.
Use case 13: Delete company details from company profile
MSS
User requests to delete a company detail from a company profile
System removes the company detail from the company profile
System confirms that the company detail has been deleted
Use case ends.
Extensions
2a. System detects that the specified company does not exist
- 2a1. System shows company profile does not exist message
2b. System detects that the company detail does not exist in the company profile
- 2b1. System shows company detail does not exist message
Use case ends.
Use case 14: List a specific company profile
MSS
User requests to view a company profile by name
System retrieves the company profile
System displays the company name and all stored details
Use case ends.
Extensions
1a. System detects that the specified company does not exist
- 1a1. System shows company profile does not exist message
Use case ends.
{More to be added}
Non-Functional Requirements
- Should work on any mainstream OS as long as it has Java
17or above installed. - Should be able to hold up to 1000 persons without a noticeable sluggishness in performance for typical usage.
- A user with above average typing speed for regular English text (i.e. not code, not system admin commands) should be able to accomplish most of the tasks faster using commands than using the mouse.
- The system should be able to run without internet access.
- The system should respond to the user within 2 seconds for all valid user commands.
- The system should remain responsive while processing invalid user commands and should return an appropriate error message.
- The system should be able to support case-insensitive unique identifiers for contacts, contact groups and company profiles.
Contact Non-Functional Requirements
- The system should be able to support up to 1000 contacts without exceeding the 2 seconds response time limit for operations such as adding, deleting, listing of contacts.
Contact Group Non-Functional Requirements
- The system should be able to support at least 500 contact groups without exceeding the 2 seconds response time limit for operations such as adding, deleting, listing of contact groups.
- The system should be able to support at least 100 contacts in a contact group without exceeding the 2 seconds response time limit for operations such as adding, deleting, listing of contact group members.
Company Profile Non-Functional Requirements
- The system should support at least 100 company profiles without exceeding the 2 seconds response time limit for operations such as adding, deleting, listing of company profiles.
{More to be added}
Glossary
- Mainstream OS: Windows, Linux, Unix, MacOS
- Above average typing speed: 40 words per minute (wpm) or more for regular English text (i.e. not code, not system admin commands)
- Valid user command: A user command that is correctly formatted and does not violate any constraints of the system.
- Invalid user command: A user command that is incorrectly formatted or violates constraints of the system.
- Contact: A stored record representing a potential candidate that the headhunter is recruiting for.
- Contact Group: A tag used to identify different contacts and group similar contacts. A contact group can have none to many contacts.
- Company Profile: A stored record representing a client company that the headhunter is recruiting for.
- Company Description: A detail of a company profile that describes the company. A company profile must have a company description.
- Company Role: A detail of a company profile that describes the role that the headhunter is recruiting for. A company profile may or may not have company roles.
- Company Role Description: A detail describing the role that the headhunter is recruiting for within the company. A company role must have a company role description.
{More to be added}
Appendix: Instructions for manual testing
Given below are instructions to test the app manually.
Note: These instructions only provide a starting point for testers to work on; testers are expected to do more exploratory testing.
Launch and shutdown
Initial launch
Download the jar file and copy into an empty folder
Double-click the jar file Expected: Shows the GUI with a set of sample contacts. The window size may not be optimum.
Saving window preferences
Resize the window to an optimum size. Move the window to a different location. Close the window.
Re-launch the app by double-clicking the jar file.
Expected: The most recent window size and location is retained.
{ more test cases … }
Deleting a person
Deleting a person while all persons are being shown
Prerequisites: List all persons using the
listcommand. Multiple persons in the list.Test case:
delete 1
Expected: First contact is deleted from the list. Details of the deleted contact shown in the status message. Timestamp in the status bar is updated.Test case:
delete 0
Expected: No person is deleted. Error details shown in the status message. Status bar remains the same.Other incorrect delete commands to try:
delete,delete x,...(where x is larger than the list size)
Expected: Similar to previous.
{ more test cases … }
Saving data
Dealing with missing/corrupted data files
- {explain how to simulate a missing/corrupted file, and the expected behavior}
{ more test cases … }
\p
^\s/
\p
^\s/
\p
^\s/
\p
^\s/